I’m impatient. Spontaneous, spur-of-the-moment concepts intrigue me. Once I’ve got the hang of something, I like to move onto the next shiny challenge. Follow-through and maintenance suffocate me. I offer my neglected and haphazard filing system as proof.
Given my capricious nature, sourdough and I should not get along. Until the pandemic virtually locked me in the kitchen, I have struggled with it. I’ve abandoned starter a few days into the process or forgotten about it, only to uncover a bowl of bubbling toxic goo. When I obtained some healthy starter from a sourdough workshop, I ended up shoving it to the back of the fridge where it starved to death behind a jar of pickles.
And yet, since the pandemic, I have not only made starter from scratch, I have maintained it, named it, shared it, and baked a good dozen loaves from it. I’ve also learned a few things along the way.
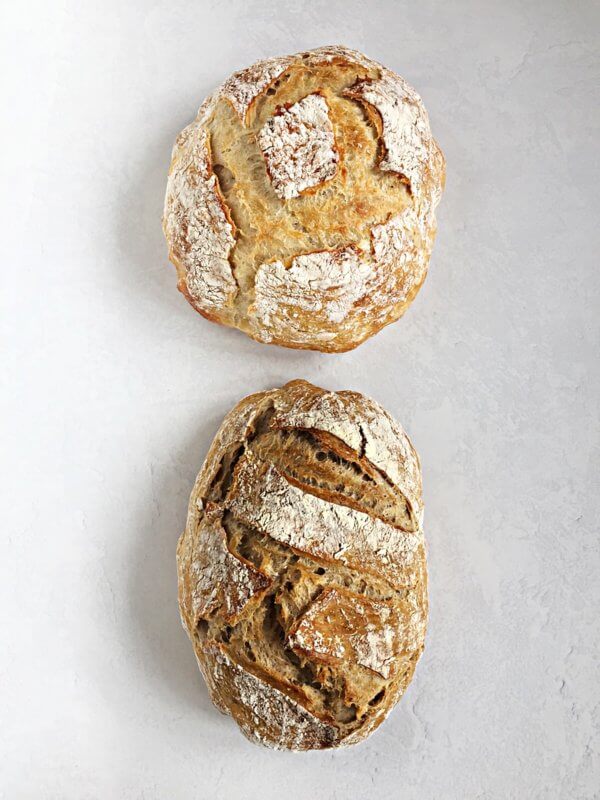
The two loaves pictured above are proof. They are also the result of my trademark impatience and spontaneity. And the forced focus brought on by the lockdown.
HOW TO MAKE (Semi) SOURDOUGH FASTER
As I said, I’m impatient. I get restless feeding the starter, waiting 8 hours, mixing the dough, waiting 48 hours, folding the dough, waiting… You get the picture. So I decided to give up and make classic no-knead bread instead. This bread, made famous by Jim Lahey, takes 5 minutes of work and 18 to 24 hours of waiting (or “one sleep” for those of us who have lost all sense of time). It also requires a mere 1/4 teaspoon of yeast, so a single 7g-package will make a good 8 to 9 loaves. Perfect for the yeast shortage.
A MORE FLAVOURFUL NO-KNEAD BREAD
As I said, I’m also spontaneous. I don’t always think things through. This sometimes results in disaster. Sometimes triumph. This time, I got to do a victory lap around the kitchen table.
At the same time that I decided to make the classic no-knead, it was also time to feed the starter. I had promised some to friends, so was going to feed it even if I wasn’t going to make sourdough for myself. Instead of discarding the excess, I dumped it in with the no-knead dough. The results? My husband’s favourite bread of the pandemic — so far. It is a bit lighter and softer than the standard sourdough, but still has air pockets and a good chew. It also develops some of the sourdough tang. Win-win.
PREVENTING A BURNED BOTTOM
Over the course of baking many, many loaves, I also managed to solve the issue of the burned bottom. Most instructions say to place the rack in the lower third of the oven. When I did, my loaf’s bottom charred so badly I had to cut it off. Moving the rack to the middle resulted in a bottom that was merely burned. And yes, I have a good, heavy, enamelled cast-iron Dutch oven.
When I placed a cast-iron trivet inside the Dutch oven, the loaf emerged with the dreaded “soggy bottom”. It was pale, and doughy – just like me.
My friend Monica, whose father ran a bakery, suggested I set the Dutch oven on a couple of stacked baking pans. This worked perfectly. The bottom crust was crisp and golden. No amputation required. I have also had success using a baking stone and a baking steel (separately, not stacked). Take your pick.
VARIATIONS ON A THEME
The loaf at the top of the photowas made with only all-purpose flour and baked in a round Dutch oven. The loaf on thebottomwas made with 2/3 all-purpose and 1/3 whole wheat and was baked in an oval Dutch oven. I varied the slashing to suit the shape of the vessel. Use what you have.
I will try a seed version soon. Impatience failed me on this variation the last time. Next time I attempt it, let’s hope spontaneity saves the day.
3 cups (450 g) all-purpose flour* (can replace 1/3 with whole wheat) 1/4 teaspoon (1.25 mL) instant yeast 1 1/2 teaspoons (7 mL) salt 1 1/2 cups (350 mL) water 1/4 cup (60 mL) (or more) sourdough starter** (you don’t need to feed it first)
Instructions
In a large mixing bowl, combine the flour, yeast and salt.
Place the water in a 2-cup measuring cup. Add the starter and stir until the water looks milky. (Note: The starter doesn’t need to float to the top like with classic sourdough. Remember, I’m impatient.)
Pour the water over the flour and stir until blended, about 1 minute. The dough will be rough and shaggy, and fairly sticky.
Cover the bowl with plastic wrap, a silicone lid, or inverted plate. Leave at room temperature for 12 to 24 hours. (The warmer your kitchen, the quicker the rise. It’s early spring and cool here. I waited about 18 hours). The dough is ready when it has doubled and is full of air bubbles.
Dust your work surface with flour. Using wet hands, pull the dough out of the bowl and onto the work surface. If dough is sticking, add more flour as needed.
Flour your hands. Take one edge of dough and gently stretch it up and outward, then fold into the centre. Repeat with remaining 3 corners. Cover and let rest 15 minutes. Repeat the stretch-and-fold procedure. You will now have a ball.
Place the dough in a floured proofing bowl (banneton) or in a bowl with a tea towel generously coated in flour. Place SEAM SIDE UP. Cover and let rest 1 to 2 hours.
While the dough rests, place two-stacked baking sheets, a pizza stone, or a baking steel on the middle rack as insulation.*** Place a 6-8 litre cast-iron Dutch oven on top of your insulation barrier of choice and put the lid on. Preheat the oven to 450˚F (230°C). The extended heating time will help the bread bake.
The dough is ready when it springs back half way when given a light poke. Invert the dough onto a piece of parchment large enough to hold dough.
Slash the dough with a sharp knife or a lame (metal blade). A long slash will produce a longer loaf, a square slash will keep it round.
Lift the parchment by the edges and place it and the bread into the hot Dutch oven. Cover and bake 30 minutes. Remove the lid and continue baking 15 to 25 minutes, or until it reaches the desired darkness. If you’re not sure your bread is done, insert a thermometer into the centre of the bread from the side. It should read between 190°F and 210°F (88°C and 99°C). The more dense the bread, the higher the loaf’s internal temperature should be.
When done, lift the bread from the Dutch oven using the parchment as handles. Cool bread on a rack for at least an hour before slicing. The loaf will continue to cook during this time. It is normal to hear a crackle. If you tap on the bottom of the loaf it will sound hollow.
Notes
* You can use bleached or unbleached all-purpose flour, or bread flour.
** You don’t need to feed the starter. You can use the discarded starter or just grab some from your refrigerated stash. Don’t worry about accuracy. If you add more starter than needed, it works just fine. I’ve added up to 1/2 cup (125 ml). The starter can be cold or room temperature. Don’t fuss. Just try it.
***Not everyone has problem with their loaves burning on the bottom. If it’s not an issue for you, skip this step.